RubyでCloudNaturalLangageを使ってみた。
CloudNaturalLangageをRubyで動かしてみる!
その後Railsでこれを使ったWebアプリを作りたい。
Cloud Natural Language | Cloud Natural Language API | Google Cloud
こちらを使ってテキストの中から単語の抽出をしてみたり、
発言のネガポジ度測定をしたりできます。
1.APIkeyの取得
Google Natural Language API を活用した誰でも出来る!自然言語処理! - WonderPlanet Tech Blog
こちらを参考にどうぞ!!
APIkeyは後ほどソースコードで使用しますのでしっかりと記録しておきましょう。
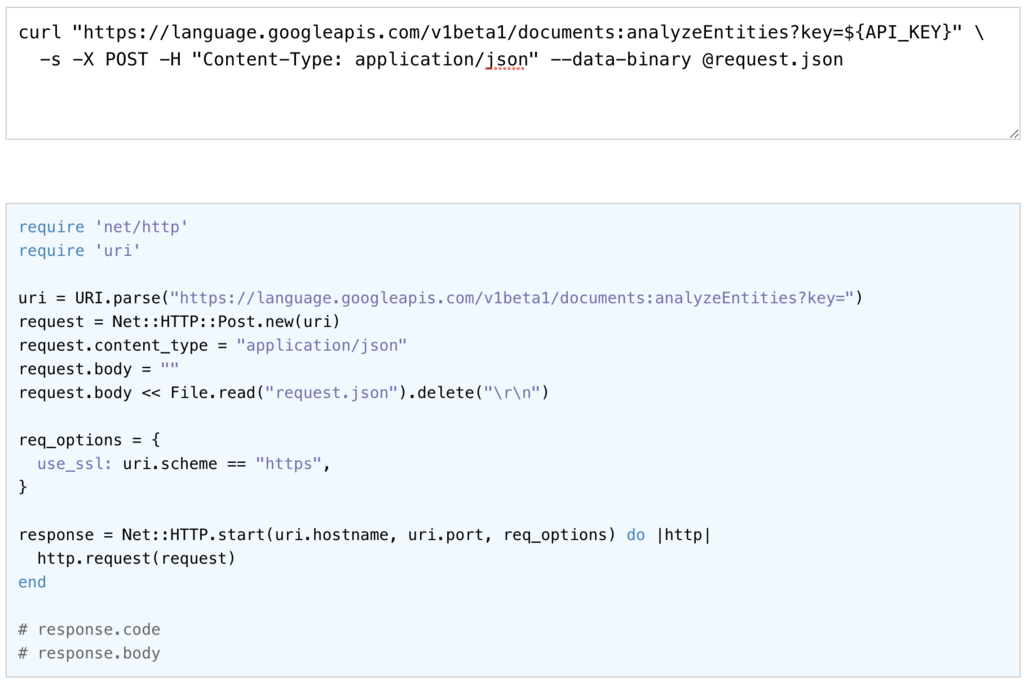
2.公式からcurlコマンドを取得
Natural Language API でエンティティと感情を分析する
上記で欲しいものを選択する。
今回の私の場合はentitiesの単語を抽出したいので「10.多言語の自然言語処理」を選択します。
ページ内に上記のcurlコマンドがあるのでそちらを参考にしましょう。

下記のサイトでrubyのコードに変換します。
curl-to-ruby: Convert curl commands to ruby's net/http

こちらを参考にサンプルコードを生成していきましょう。
4.コード作成
require 'net/http'
require 'uri'
require 'json'

uri = URI.parse("https://language.googleapis.com/v1beta1/documents:analyzeEntities?key=取得したAPIkeyをこちらへ")
request = Net::HTTP::Post.new(uri)
request.content_type = "application/json"
request.body = ""
request.body = '{
                  "document":{
                    "type":"PLAIN_TEXT",
                    "content": "Google, headquartered in Mountain View, unveiled the new Android phone at the Consumer Electronic Show.  Sundar Pichai said in his keynote that users love their new Android phones." #こちらに検査したい文字列を挿入
                  }
                }'

req_options = {
    use_ssl: uri.scheme == "https",
}

response = Net::HTTP.start(uri.hostname, uri.port, req_options) do |http|
  http.request(request)
end
json = JSON.parse(response.body)
p json

p json['entities'][0]['name']#=> "Google"
p json['entities'][1]['name']#=> "users"
p json['entities'][2]['name']#=> "phone"
p json['entities'][3]['name']#=> "Android"
5.出力結果
% ruby test.rb [20:55:53]
{"entities"=>[{"name"=>"Google", "type"=>"ORGANIZATION", "metadata"=>{"mid"=>"/m/045c7b", "wikipedia_url"=>"https://en.wikipedia.org/wiki/Google"}, "salience"=>0.25572062, "mentions"=>[{"text"=>{"content"=>"Google", "beginOffset"=>-1}, "type"=>"PROPER"}]}, {"name"=>"users", "type"=>"PERSON", "metadata"=>{}, "salience"=>0.1527633, "mentions"=>[{"text"=>{"content"=>"users", "beginOffset"=>-1}, "type"=>"COMMON"}]}, {"name"=>"phone", "type"=>"CONSUMER_GOOD", "metadata"=>{}, "salience"=>0.13119894, "mentions"=>[{"text"=>{"content"=>"phone", "beginOffset"=>-1}, "type"=>"COMMON"}]}, {"name"=>"Android", "type"=>"CONSUMER_GOOD", "metadata"=>{"mid"=>"/m/02wxtgw", "wikipedia_url"=>"https://en.wikipedia.org/wiki/Android_(operating_system)"}, "salience"=>0.122452624, "mentions"=>[{"text"=>{"content"=>"Android", "beginOffset"=>-1}, "type"=>"PROPER"}, {"text"=>{"content"=>"Android", "beginOffset"=>-1}, "type"=>"PROPER"}]}, {"name"=>"Sundar Pichai", "type"=>"PERSON", "metadata"=>{"mid"=>"/m/09gds74", "wikipedia_url"=>"https://en.wikipedia.org/wiki/Sundar_Pichai"}, "salience"=>0.11414111, "mentions"=>[{"text"=>{"content"=>"Sundar Pichai", "beginOffset"=>-1}, "type"=>"PROPER"}]}, {"name"=>"Mountain View", "type"=>"LOCATION", "metadata"=>{"wikipedia_url"=>"https://en.wikipedia.org/wiki/Mountain_View,_California", "mid"=>"/m/0r6c4"}, "salience"=>0.101959646, "mentions"=>[{"text"=>{"content"=>"Mountain View", "beginOffset"=>-1}, "type"=>"PROPER"}]}, {"name"=>"Consumer Electronic Show", "type"=>"EVENT", "metadata"=>{"mid"=>"/m/01p15w", "wikipedia_url"=>"https://en.wikipedia.org/wiki/Consumer_Electronics_Show"}, "salience"=>0.070343755, "mentions"=>[{"text"=>{"content"=>"Consumer Electronic Show", "beginOffset"=>-1}, "type"=>"PROPER"}]}, {"name"=>"phones", "type"=>"CONSUMER_GOOD", "metadata"=>{}, "salience"=>0.03383166, "mentions"=>[{"text"=>{"content"=>"phones", "beginOffset"=>-1}, "type"=>"COMMON"}]}, {"name"=>"keynote", "type"=>"OTHER", "metadata"=>{}, "salience"=>0.01758835, "mentions"=>[{"text"=>{"content"=>"keynote", "beginOffset"=>-1}, "type"=>"COMMON"}]}], "language"=>"en"}
"Google"
"users"
"phone"
"Android"
ActionCableの使い方
参考サイト
Rails5.2が出たし、このタイミングでActionCableを使う - ひよっこエンジニアの雑多な日記
Action Cableでリアルタイムチャットアプリの作成方法 (Rails 5.1.4にて)(その1) herokuで動かす! - Qiita
久しぶりに授業とインターン以外で勉強できたので記録。
1.下準備
$ rails new actionCableTest
$ cd actionCableTest
$ rails db:create
2.コントローラー生成
$ rails g controller chat_rooms show
3.モデル生成
$ rails g model chat_message content:text
$ rails db:migrate
4.Controller編集
app/controllers/chat_rooms_controller.rb
class ChatRoomsController < ApplicationController
  def show
    @chat_messages = ChatMessage.all
  end
end
5.View編集
app/views/chat_rooms/show.html.erb
<h2>ChatRoom</h2>
<div id="chat">
  <% @chat_messages.each do |chat_message| %>
    <p><%= chat_message.content %></p>
  <% end %>
</div>
6.routeの訂正
config/routes.rb
Rails.application.routes.draw do
  root 'chat_rooms#show'
end
7.channelの生成
$ rails g channel chat_room speak
動作確認
$ rails s
DevelopperTool(F12) -> Console
App.chat_room.speak()
trueが帰ってくるはず!
8.channel編集
app/channels/chat_room_channel.rb
class ChatRoomChannel < ApplicationCable::Channel
  def subscribed
    stream_from 'chat_room_channel'
  end

  def unsubscribed
    # Any cleanup needed when channel is unsubscribed
  end

  def speak(data)
    chat_message = ChatMessage.create!(content: data['message'])
    ActionCable.server.broadcast 'chat_room_channel', message: chat_message.content
  end
end
app/assets/javascripts/channels/chat_room.js
App.chat_room = App.cable.subscriptions.create("ChatRoomChannel", {
    connected: function() {
        // Called when the subscription is ready for use on the server
    },

    disconnected: function() {
        // Called when the subscription has been terminated by the server
    },

    received: function(data) {
        // Called when there's incoming data on the websocket for this channel
        var chat = document.getElementById('chat');
        var newMessage = document.createElement('p');
        newMessage.innerText = data['message'];
        chat.appendChild(newMessage)
    },

    speak: function(message) {
        return this.perform('speak', { message: message });
    }
});
9.view編集
app/views/chat_rooms/show.html.erb
<h2>ChatRoom</h2>
<div id="chat">
  <% @chat_messages.each do |chat_message| %>
    <p><%= chat_message.content %></p>
  <% end %>
</div>

<form>
  投稿: <input type="text" />
  <input type="submit" value="投稿" onClick="postChatMessage()" />
</form>
10.JSのメソッド追加
app/assets/javascripts/application.js
function postChatMessage() {
    event.preventDefault();
    var element = document.querySelector('input[type="text"]');
    App.chat_room.speak(element.value);
    element.value = '';
}
enumerizeの使い方。
<参考>
RailsでEnumerizeの使い方 | Gemの紹介 | DoRuby
1.(Gemfile)の使い方
gem 'enumerize'
$ bundle install
2.モデルの編集
class User < ActiveRecord::Base
  extend Enumerize

  enumerize :sex, in: [:male, :female]  #配列
  enumerize :role, in: {:user => 1, :admin => 2}  #ハッシュ
end
3.ja.ymlの編集
ja:
  enumerize:
    user:
      sex:
        male: 男
        female: 女
      role:
        user: 会員
        admin: 管理者
ransackの使い方
<参考>
Basic Search Using Ransack - RichOnRails.com
1.新規プロジェクト生成
$ rails new ransack_sample_app
$ cd ransack_sample_app
2.(Gemfile)に追加
gem 'ransack'
$ bundle install
3.モデルをgenerate
$ rails g model Product name
4.テストデータ生成
(db/seeds/rb)
Product.delete_all

Product.create!(name: 'Apples')
Product.create!(name: 'Oranges')
Product.create!(name: 'Strawberries')
Product.create!(name: 'Bananas')
Product.create!(name: 'Blueberries')
Product.create!(name: 'Pears')
Product.create!(name: 'Grapes')
5.Controllerをgenerate
$ rails g controller Products index
6.ルートを変更
(config/routes.rb)
Rails.application.routes.draw do
  root to: 'products#index'
  resources :products
end
7.Controllerの編集
(app/controllers/products_controller.rb)
class ProductsController < ApplicationController
  def index
    @q = Product.ransack(params[:q])
    @products = @q.result
  end
end
8.Viewの編集
(app/views/products/index.html.erb)
<h1>Products</h1>

<%= search_form_for @q do |f| %>
  <%= f.label :name_cont %>
  <%= f.search_field :name_cont %>
  <%= f.submit %>
<% end %>

<table>
  <thead>
  <tr>
    <th><%= sort_link(@q, :name) %></th>
  </tr>
  </thead>
  <tbody>
  <% @products.each do |product| %>
    <tr>
      <td><%= product.name %></td>
    </tr>
  <% end %>
  </tbody>
</table>
9.サーバーを立ち上げて確認
$ rails s
CarrierWaveを試してみる。
参考
1.新規プロジェクト生成
$ rails new carrierwave_sample_app
$ cd carrierwave_sample_app
2.(Gemfile)に追加
gem 'carrierwave'
$ bundle install
3.generate
$ rails g scaffold user name:string password:string
4.データベース生成
$ rails g migration add_avatar_to_users avatar:string$ rails db:create db:migrate
5.(app/models/user.rb)を変更
class User < ApplicationRecord
 mount_uploader :avatar, AvatarUploader
end
6.(app/views/users/_form.html.erb)
<div class="field">
  <%= form.label :avatar %><br>
  <%= form.file_field :avatar %>
</div>
6.(app/controllers/users_controller.rb)
def user_params
  params.require(:user).permit(:avatar, :name, :password)
end
7.(app/views/users/show.html.erb)
<img src="<%= @user.avatar %>" width="100">
8.サーバー立ち上げて確認
$ rails s
UnityでimportしたARアプリをiOS端末にビルドするまで(新規作成時)
==環境==
・MacBookPro HighSierra 10.13.6
自分がexportしたデータをimportした時はこれでうまくいきました。
余談ですが、Winでexportされたものはうまく動きませんでした知らないです。
この時、Androidならbuildできたためほんとよくわからないです。下記手順でやればできるかも?
==手順==
・Unityでプロジェクトを新規作成。
・Assets -> import Package -> Custom Package(選択する)
・_Sceneの中からbuildしたいSceneを選ぶ
・(重要?)ARCoreCloudAnchorAPIを新規作成。(使いまわすとうまくいかないぞ)
・Edit -> Product Settings -> ARCore を開き、各種設定
・File -> Build Settings
・Add Open Scenes
・Switch Platforms
・Player Settings を開き、各種設定
後半5項目については下記の記事で詳しく書いているため参考にしてください
セットアップからARCoreでSharingアプリを動かすまで - Railsprogram’s diary
Unityで変数を同期する方法。
UNET⑤ たくさんある情報の送信方法の解説 - MOTOYAMA BLOG
UNET⑨ SyncVarで変数を同期する - MOTOYAMA BLOG
CommandとSyncvar(list)を用いることで同期可能。
クライアント⇨ホストに情報を伝達するのはCommandで、
それにより更新されるSyncvarは自動でホスト⇨クライアントに同期される。
Commandで渡せる引数は(データ送信として使う場合)数が限られているため公式で確認する必要がある。